11/25/17

Queen Foam Front Cards...

Hey crafty friends, its Laurie Willison here!  I am stopping in today with another round of clean and simple!  :)   

If you are new to Queen and Company, let me tell you about their amazing foam fronts.  These foam fronts are the bases for a quick and easy shaker card.  These foam fronts are also pretty amazing when NOT used as a shaker card.  The foam front comes with 2 sides of adhesive so you can stick the foam panel to your card base and then you can stick whatever you want to the front too.  Obviously, the foam front is a great anchor for the acetate of a shaker card, but it is also great for dunking in glitter, adding patterned paper or even using the cardstock front that comes with it.  That is what I did today.  Using the Lines Foam Front, I did a little ink blending on the entire cardstock piece, negatives and all, and then turned around and made 2 cards....

IMG_5331

This first card is made up of a card base, the foam front and the cardstock panel included with the foam front, and a sentiment die.  Super easy and quick and lots of dimension.  These new sentiment dies are so much fun.  I cut them out of black cardstock and then added a little glossy accents for some shine.  

Now this card was super quick too....I just added the negative from the first card right onto the card base.  I love the rainbow effect from the ink blending.  I added another one of the new sentiment dies to this card....

IMG_5328

Head on over to the Queen and Company blog to check out all the foam fronts.   There is lots to choose from and the possibilities are endless!

So glad you stopped in today!  Hope you had a wonderful thanksgiving!  


11/23/17

Thanksgiving Day Sale...

Check out this great sale on Simon Brand Products today over at Simon Says Stamp!  

Click HERE to shop!  

Happy thanksgiving to all my crafty friends!  


11/22/17

MFT Sketch Challenge....

Happy Wednesday!  Today we are bringing another round of MFT's Wednesday Sketch Challenge.  If you are new to MFT, every Wednesday a new sketch is available to play along with.  Sketches are an amazing way to bring back that lost mojo or just spark some creativity.  

I love this week's sketch!  I am a clean and simple card maker and this sketch works so well for that type of card.  Here is my card for this week....

MFT WSC360 Sketch

For this card, I used a Mod Rectangle Stax for the background after doing a little ink blending, water misting and white paint splatter.  I love this effect!  Next, I added in a vellum banner to hold the "hugs" sentiment die.  I added a little black and white washi onto white cardstock.  I cut it down and then tore the edges for that fun washi look.  By adding the washi to the white cardstock first, it gives it a bright white striped look.  To finish off the card, I added in little coordinating hearts along the side with some glossy accents and glitter.  

MFT WSC360 Sketch

I used a little creative license with this sketch adding the hearts for the vertical elements in the sketch....


Head on over to the MFT Challenge Blog for a list of stops to make to see more inspiration using this week's sketch.  I hope you can play along too!  Have a great day!


~~~~~~~~~~~~~~~~~~~~


Supply List: 


11/20/17

Spellbinders November Blog Hop...

Welcome to the Spellbinders November blog hop!  I am so excited to be joining in on this hop with some amazing crafters today.  We are sharing the latest release from Spellbinders for November 2017.      I am so excited you are joining me here today.  You can follow me over on Instagram for more crafty fun at @laurie_willison. 

When I saw the release and spotted this adorable collection called Love Set Match, I fell in love!  I have lots of pictures here so hang in there with me.  :)

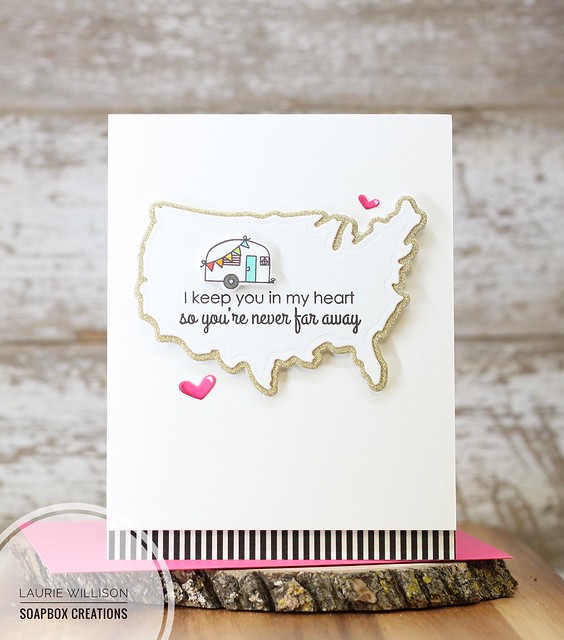
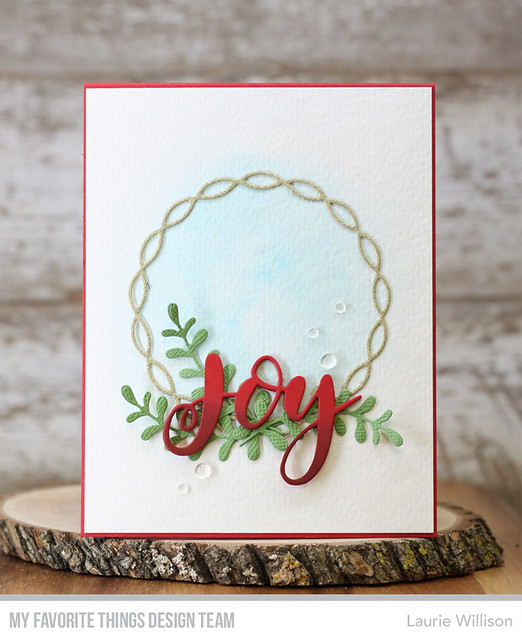
This first card showcases the new set from the Love Set Match, called Near or Far...

Untitled

I love clean and simple, so I knew when I saw the adorable die of the US and its outline I could create a fun CAS card.  First, I die cut the "shadow" out of some gold glitter cardstock.  Next, I die cut the main die out of white cardstock.  I die cut and color that adorable little camper and then popped it up on foam tape, after I stamped the sentiment.  The die set also comes with those adorable hearts, so I cut a couple of hearts and then did a little Copic coloring to give a little dimension.  I trimmed the bottom of the card front so I could add a little striped washi to the card base, and then popped the from up on fun foam to finish it off.  

~~~~~~~~~~~~~~~~~~~~~~~

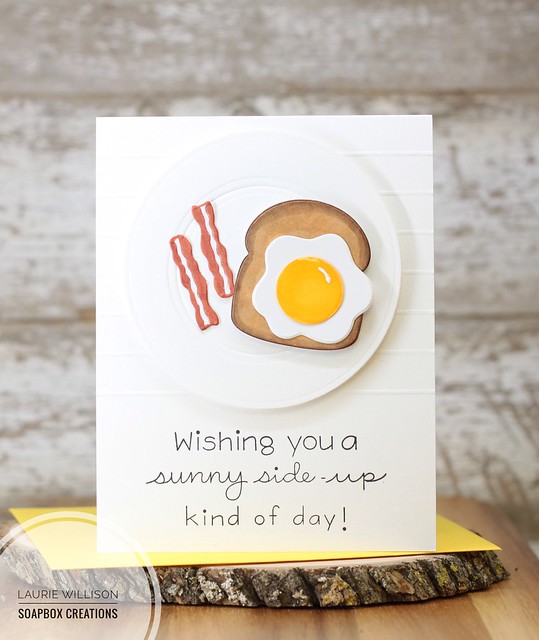
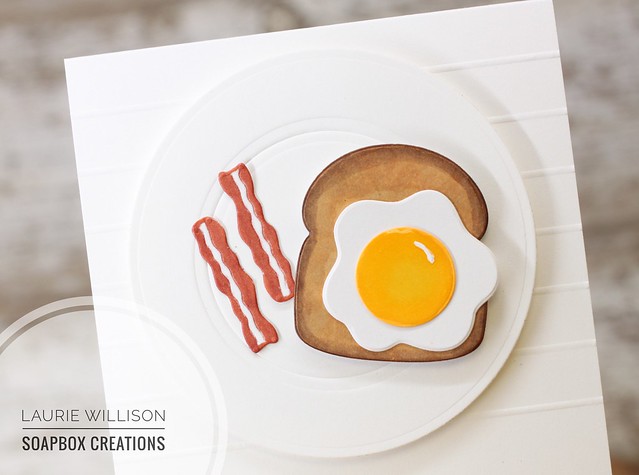
Another stamp set in this new release is called The Breakfast Club.  I just love this set.  It comes with some adorable sentiments and the cutest dies!  

Untitled

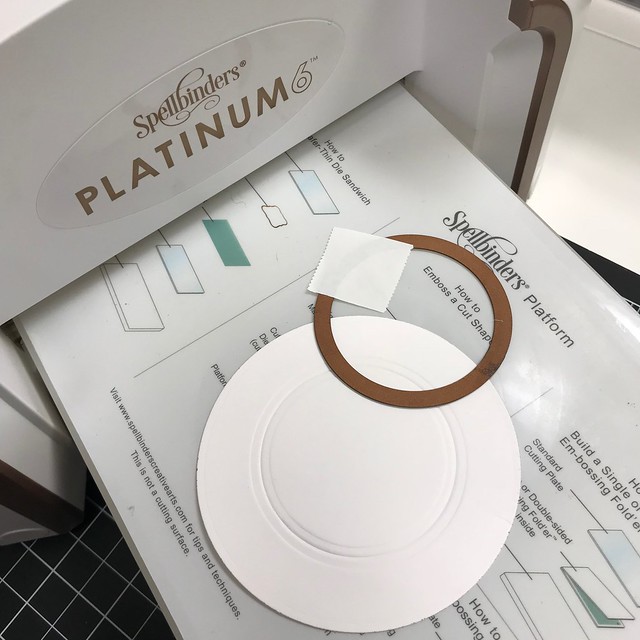
To create this card, I stamped a sentiment on the bottom of the card base and then added a few score lines above it.  Next, I used the Standard Nestabilities Circles to create a plate for my eggs and toast.  

Untitled

First, I cut the large circle and then took a smaller circle and embossed it in the center....I promise it didn't come out as crooked as it looks in this picture.  :)
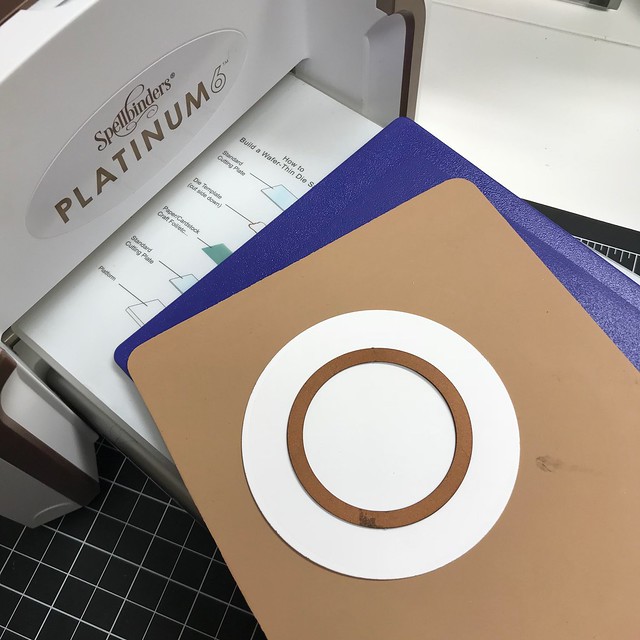
Untitled

The Spellbinders Platinum 6 Die Cut Machine is AMAZING!  When embossing your dies, it gives an a beautiful impression.  So just with these 2 circles, one to cut and one to emboss, I have my own plate...

Untitled

I added the plate to the card front with fun foam, and then served up the toast, egg and bacon.  

Untitled

~~~~~~~~~~~~~~~~~~~~~~~~~~

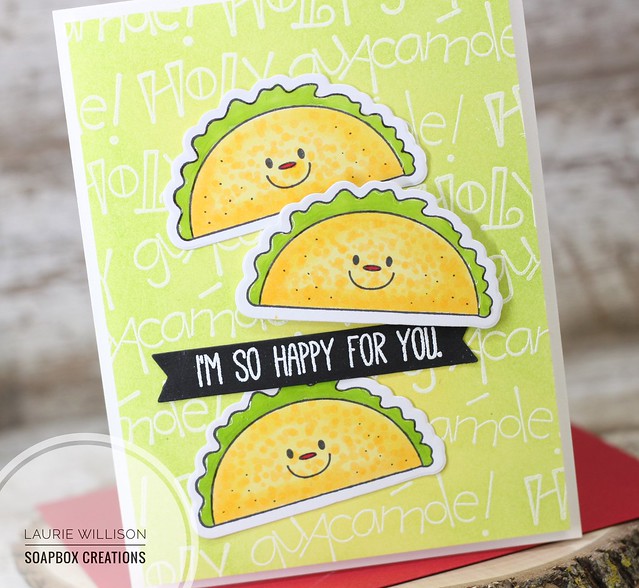
One more set that called my name is called Cool Beans.  When I saw those Tacos smiling at me?  Yep!  Because who doesn't love tacos?  

Untitled

I used the sentiment "Holy guacamole!" in the background with a little ink blending.  Then I colored and die cut the 3 tacos....


Spellbinders open dies make die cutting the images super easy!


I filled in the lettuce on the taco with some Tonic Nuvo Drops for a little shine....


Last, I heat embossed a sentiment on a black banner and arranged the tacos on the card front.  

Untitled

I hope you have enjoyed my Spellbinders projects today!  There is lots mores to see for the November Release.  Here is a list of places to stop...

Laurie Willison you are here!
Nicole Picadura

 To celebrate this release, Spellbinders is giving away a $50 gift certificate to FIVE lucky winners. Please leave a comment on Spellbinders blog by Sunday, November 26th 11:59 pm EDT for a chance to win. The winners will be announced in the blog hop post on Spellbinders blog the following day.

Spellbinders is also giving me a $25 gift certificate here on my blog.  Please leave a comment here by Sunday, November 26th 11:59 pm EDT for a chance to win. The winner will be announced here on my blog the following day.

So glad you stopped in today.  Hope you have a great week!  

Laurie 

~~~~~~~~~~~~~~~~~~~~~~~~~~~~

Supply List:

Stamps: 

The Breakfast Club
Cool Beans
Near or Far
Spellbinders Platinum 6 Die Cutting Machine

11/16/17

Holiday Place Setting Tags...

Yesterday I was a part of an Instagram Hop for the 25 Days of Christmas Tags.  Head on over to IG and follow me @laurie_willison and you can follow and comment to win prizes.  

I thought I would stop in here and share my projects.  These are SO very easy to make!  I love to personalize my table for the holidays and there are 2 products from Concord and 9th that will help you do just that!


To start, I grabbed some mini grapevine wreaths from Hobby Lobby or you can get them from Amazon....links below in my supply list.  

You can grab any tag you have for these place setting tags.  I took the Sophisticated Script set and stamped each of my friends names....

Untitled

I took a small piece of red and white striped washi and wrapped the top of the tags.  

Untitled

Next, I stacked the tags up and used my Crop-o-Dile to cut holes in the stack of tags.  

Untitled

Next, I cut some boughs from the Take A Bough die set.  This die set is SO much fun because you can create your own paper tree.  Or in this case, it just adds a little greenery to the place setting.  

Untitled

To finish off the tags, I tied the tag, the boughs and a silver bell to the grapevine wreath with some Lawn Fawn Glitter Twine.  

Untitled

Seriously these are just super easy and quick and paired with a fun napkin, your holiday table is sure to look festive!  

Don't forget to stop on over to Instagram and find me.... @laurie_willison and follow and comment for a chance to win!  There are lots of prizes to be given away!  

So glad you stopped in today! Thanks for coming by!


~~~~~~~~~~~~~~~~~~~~~~~~~~~~~~~~~~~~~

Supply List:

Misc: Pretty Pink Post Silver Bells
Mini Grapevine Wreaths or from Hobby Lobby

11/15/17

MFT Wednesday Sketch Challenge...

Good morning!  It is time for another weekly Wednesday sketch over at My Favorite Things.  Today's sketch is right up my alley....clean and simple!  First off, here is my card....

MFT WSC 359

I used the Square Peek-a-boo Window in the background and then filled it with a little kraft polka dot paper from the Dots and Stripes Neutral pack.  Next, I added a vellum banner and sentiment to the front of the card.  Last, I popped up those adorable coffee cups on foam tape.  The coffee sets from this latest release called, Coffee Break and Coffee Date, are so fun and so versatile!

Here is this week's sketch....

Head on over to the MFT Blog to see more sketch inspiration this week.  So glad you stopped in! 


11/13/17

MFT Release Replay...

Hello there!  I am stopping in today with a card for the November MFT Release Replay.  One of the newest Die-namics this month is called Linked Chain Circle Frames.  Its is beautiful and so full of possibilities!  Today I used the middle circle frame and did a little die cutting with MFT's Gold Sparkle Card Stock....if you don't have any of this glittery goodness...you need some!  :)

Print

First, I did a light watercolor wash in the background.  I added the chain frame in the gold glitter card stock.  Next, I added in a few of the Fab Foliage leaves in green card stock.  To finish off the card front, I added in the Die-namics Joy in red cardstock, after doing a little dark red ink blending along the bottom.  For a tiny bit of bling, I added in some Clear Droplets.

Check out the MFT Blog for more November Release inspiration.  Thanks for stopping in today. Hope you have a great day!

11/07/17

MFT November Product Launch...

The MFT November Release is ready to shop!  Are you ready?  So many great new products this month but I thought I would stop in with one last card for tonight Product Launch...

MFT November Release

This set is called You Make My Heart Melt and its just so adorable!  Lots of fun images in included to make your card front sing.  I added some white stitched slopes on to the this light gray card base.  Then I added in all the colored images.  I grabbed some tree die cuts from the Scenic Snow Globe die set and added those in too.  It's hard to see but I added the heart in white ink on the top of the card.  

MFT November Release

The MFT Blog will have lots to see and all the details about the November Release.  I can't wait for you to check it out and hear all about whats on your wishlist!  

Thanks for stopping in today and have a great day!

11/06/17

MFT Countdown Day 1...

Today is the last day of the MFT November countdown!  I have one last card to share today using an image from the new set, New Best Friend and "Let's Cuddle", the free stamp with purchase this month.  

MFT November Release
This card was super easy to make.  I scored the background using my Scor-buddy every 1/2".  Then I cut a stitched panel using the Stitched Rectangle STAX.  I stamped the "Let's cuddle" in black ink and popped the panel up on foam tape.  Last, I colored that adorable little gal and her kitten using Copics.  I added her to the card with a little bit more foam tape and that's it!  

Check out the MFT blog for more details on the free stamp this month.  Tomorrow is the day!  Everything will be available at 8pm CST for purchase over at MFT.  So glad you stopped in today!  Will be back tomorrow with one more card to share at product release time.  :)

Have a great day!

November My Monthly Hero Blog Hop....

Hello!  Today I am here with a few projects made using the November My Monthly Hero Kit.  This is a gorgeous new kit, just in time for Christmas.  I have lots of details to share at the end of this post that will give you more info on this kit and a giveaway!  If you are following along on the hop, you stopped in from my amazing friend, Jennifer's blog.  Scroll down to see where to go next!

I love making tags for my gifts and this kit works perfectly for just that!  

Untitled

I stamped the tree, snowflake and star images and cut them out with their out "tag" die.  The die cuts a hole in each shape and then you have a instant tag.  I added a few little extra details, but I love to keep things easy to mass produce or recreate.  I stamped the Christmas circle in red ink and added those to the Christmas trees.  You can find that little circle in one of the add-ons called Holiday Badges.

On the back, I stamped the To: and From: on each tag....

Untitled

My favorite kind of card is a Clean and Simple card.  So this next card was quick and easy and would be perfect for mass producing.  

Untitled

I simply scored the card base every 1/2", then stamped and cut out the tree.  I added in some stickles to the ornaments for a little shine.  Next, I stamped the sentiment and then popped the tree up on foam tape for some dimension.  So easy!


My dad has played Santa for 35+ years so I have a love for all things Santa.  When I saw this little add-on, I knew I needed to cut him out and do a little watercoloring....

Untitled

This tag is called the Paper Layering Santa Tag.  He cuts out in one piece but has all the little pieces that pop out so easily.

To make this card, I masked off the bottom of the card and blended in some Delicata Golden Glitz, that is included in the kit.  That gold ink blends so smoothly.  I wish I could pick up all the shine in the photograph.  Its so pretty!  The sentiment is from the set included in the kit too.  I added some black twine and a gold bell to santa's hat to finish off this card.

Untitled

So that is it for me today.  Your next stop is over to Wanda's blog.  She gave me a sneak peek of her cards and they are amazing!  Stop over and check them out.  :)

~~~~~~~~~~~~~~~~~~~~~~~~~~~~~~~~~~~~~

The November My Monthly Hero Kit is now available over at the Hero Arts Store.  Go grab one for yourself before they are gone.  Remember you can sign up for a subscription to the kit and never miss one this way!  A few more details about the kit.....


This kit includes:

6x8 Clear Set
* 4 Tag Dies
* 4 Shaped Dies

* 60 Assorted Gift Tags (ornament, star, tree & snow flake: colored, kraft, white)

* 10 yards of red & white baker's twine

* 2 Delicata Ink Cubes (Golden Glitz + Celestial Copper)

...plus lots of adorable add-ons to go along with the main kit!


~~~~~~~~~~~~~~~~~~~~~~~~~~~~~~~~~~~~~~~


There will be a kit giveaway to one lucky commenter.  The winner will be chosen from all the comments on the blogs along the hop, so don't forget to leave a comment.  It could be YOU!


~~~~~~~~~~~~~~~~~~~~~~~~~~~~~~~~~~~~~~~

  To see more inspiration using this beautiful kit and all the add ons, here is the list of stops for this months Hero Arts Blog Hop....


11/05/17

MFT Countdown Day 2...

Are you loving this months MFT sneak peeks?  There are so many adorable new products so you will have to let me know what your favorite is so far.  I will tell you what my favorite is....

These adorable new Deer Love Die-namics.  Agh!  I love them.

MFT November Release

To create this card, I took a piece of Sno Cone card stock and did a little white paint splatter in the background.  I added in a little Hit the Slopes stitched hill at the bottom of the card.  Next, I cut the largest banner from the Essential Fishtail Sentiment Strips out of vellum and heat embossed a sentiment from the Coffee Break Sentiment set, also new this month.  Last, I grabbed the Deer Love die set and cut out 4 of each deer and 3 of the mini hearts that are included in the die set.  I stacked the dies up to create a more 3D card and then attached them to the card front.  I used a Red Copic to color the 3 hearts and glued them down.  Last, I used a little glossy accents to add some shine to each heart.  This die set?  So fun!!

MFT November Release

There is one more day left on the countdown and then all of the new November Release will be available on Tuesday the 7th at 8 pm CST.  Stop back by tomorrow to see my last countdown day sneak!  :)

Check out the MFT Blog for more details on this amazing November Release.  Thanks for stopping by and have a great day!

11/03/17

MFT Countdown Day 4...

For the Day 4 of the MFT November Countdown, I kept it very clean and simple...

MFT November Release

This adorable new stamp set is called New Best Friend.  I simply stamped the sentiment, a paw print, added a heart and the die cut the panel out with a Stitched Rectangle Die.  I popped that up on fun foam and then tucked in a piece of stitched ribbon to add some color.  Easy Peasy!

Check out the MFT Blog to learn more about the November Release.  Stay tuned for more this week!  

Have a great day!


~~~~~~~~~~~~~~~~~~~~~~~~~~~~~~~~

Supply List: 

Stamps: New Best Friend
Ink: Versafine Black Onyx
Misc: Red Stitched Ribbon 

11/02/17

MFT Countdown Day 5...

Hello there!  It is Day 5 of the MFT November Countdown....and we I am sharing a fun new die today called Mesmerizing Mandela Die-Namics.  

MFT November Release

Instead of cutting out the mandela, I decided to use it to emboss the background.  I did a little ink blending on white card stock and then die cut the sentiment PEACE, which is also available this month.  Next, I die cut the ampersand die and the joy die out of glittery black cardstock and attached everything up on fun foam.  

MFT November Release

Love these new products just in time for Christmas.  Head on over to the MFT Blog to see more about the November Release.  

So glad you stopped in today!  Thanks for coming by!


~~~~~~~~~~~~~~~~~~~~~~~~~~~~~~~~~~~~~~

Supply List:

Dies: Mesmerizing Mandela Die-Namics, Peace Die-Namics, Joy Die-Namics
 
BLOG TEMPLATE BY DESIGNER BLOGS